Using Chordwalk with MPC Beats
MPC Beats is a free application designed primarily for use with pad-based controllers. Even in its standard free version, it includes a wide selection of authentic instrument templates, and you can expand your sound library by purchasing additional expansion packs.
Using Chordwalk, any user — even with limited music theory or playing experience — can quickly create meaningful and expressive beats and solos inside MPC Beats. It offers an engaging, fun workflow that does not require external MIDI controllers, sequencers, drum pads, or the piano roll.
MIDI Setup (Windows)
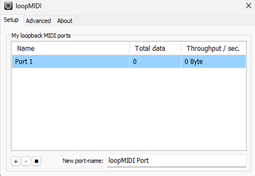
To transfer MIDI data between applications in a Windows environment, you must create a virtual loopback MIDI port.
Instructions for creating this virtual MIDI port are provided in a dedicated section of this creator’s guide.

Activating Your Virtual MIDI Port in Chordwalk
Once you have created a virtual MIDI port using loopMIDI, Chordwalk will detect it as an available MIDI source.
To allow Chordwalk to transmit MIDI data through this port, you must activate it in the MIDI Devices window.
To activate your virtual MIDI port:
Select the MIDI Devices icon in Chordwalk.
A floating window will appear showing all recognised MIDI destinations.
Activate the virtual MIDI port(s) you intend to use.
Further details on the MIDI Devices window are provided in a dedicated section of this creator’s guide.


Tracks view
Using Project Templates in MPC Beats
MPC Beats provides a range of standard project templates in the free version.
Each template includes a predefined set of instrument sounds, with each sound already assigned to a specific track in MPC Beats.
To load a new template:
Go to File and select New Project.
A window will appear showing available Project Templates, Demos, and Recent Projects.
Select the template you want to use.
Once selected, all instrument sounds associated with that template will automatically be loaded onto individual tracks within MPC Beats.
To view these instrument assignments, select Track View (shown with the blue highlight in the example in screenshot).
This will display all instruments in their respective track lanes.
Pairing Chordwalk Creation Areas with MPC Beats Tracks
A key innovation of Chordwalk is its ability to route MIDI data from any individual creation area directly to a specific instrument track in MPC Beats. This allows each creation area to control a different virtual instrument, giving you truly independent and flexible composition capabilities.
To pair a Chordwalk creation area with an MPC Beats track:
Select the MPC Beats track you want to pair with a creation area from Chordwalk.
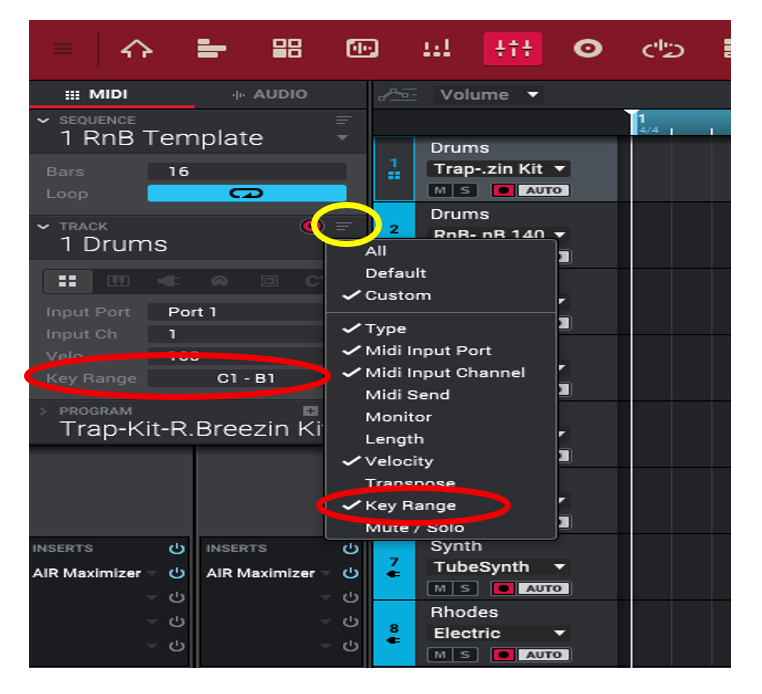
Click the Inspector Settings icon (shown in yellow in the example screenshot).
A dropdown menu will appear, listing all fields that can be shown in the Inspector.
Enable both MIDI Input Port and MIDI Input Channel so they become visible in the Inspector.
These settings will allow you to assign the correct virtual loopback MIDI port and channel to the track, making it possible for Chordwalk to control it independently.

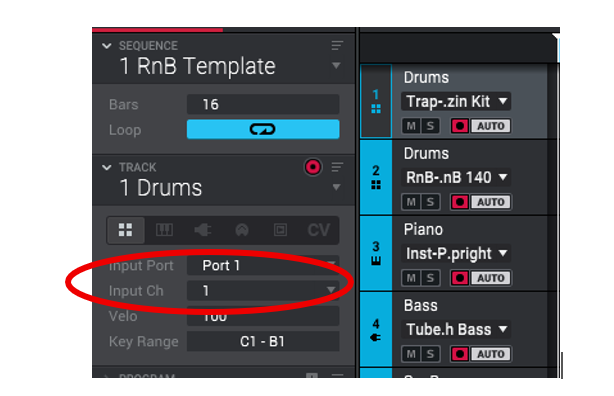
Once you have enabled the MIDI input fields in the Inspector, the MIDI Input Port and MIDI Input Channel options will now be visible (see screenshot).
Select the MIDI Port and Channel that match the channel assigned to the corresponding creation area in Chordwalk.
This completes the pairing, allowing that creation area in Chordwalk to control the selected MPC Beats track independently.
Once the MIDI port and channel are correctly assigned, the MIDI data stream from the paired Chordwalk creation area will now play—independently—the virtual instrument sound assigned to that MPC Beats track.
To set up additional tracks, simply repeat the same pairing procedure. Each Chordwalk creation area can be paired independently with its own instrument track in MPC Beats.
Important Considerations When Using MPC Beats Templates
MPC Beats templates are designed primarily for MPC pad and keyboard controllers. Because of this, certain behaviours, constraints, and limitations apply—especially when triggering drum and percussion sounds.
Individual drum samples correspond to specific note values in the lower octave ranges.
MPC Beats maps most drum sounds to the C1 octave range.
Playing outside the mapped pad range may result in incorrect samples, no sound, or unexpected noises.
To ensure correct playback, stay within the octave range intended for the instrument you are triggering.
Adjusting Note Range (Key Range) for Template Compatibility
If you want a Chordwalk creation area to correctly trigger the drum or instrument sounds associated with a specific MPC template, you must adjust the Key Range of the track to match the template’s pad mapping.
To configure the Key Range:
Select the virtual instrument track in MPC Beats.
Click the Inspector Settings icon (shown in yellow in screenshot).
A dropdown list will appear with all available Inspector fields.
Enable Key Range so it becomes visible in the Inspector.
In the Inspector, select the Key Range field and adjust it to match the note range required by the template.
This ensures that incoming MIDI notes from Chordwalk fall within the correct mapped range.
Using External Virtual Instrument Libraries
Advanced MPC users may already own a variety of third-party virtual instrument libraries.
When these libraries are assigned to tracks in MPC Beats—just as in any other DAW—the full drum and percussion ranges across all octaves become available.
In these cases:
No note-mapping adjustments are necessary.
No Key Range restrictions apply.
Chordwalk can freely trigger sounds across the entire MIDI note spectrum.
Setting the Note Range for MPC Beats Tracks
When you open the Note Range assignment screen, you will be able to define the specific note range that the selected track will respond to. This is important when using MPC Beats templates, as these templates are designed for pad-based controllers, where each pad bank is mapped to a specific set of notes within particular octave ranges.
In MPC Beats, drum tracks are typically mapped to the C1 octave range.
For drum tracks, it is recommended that you set:
Note Min: Octave 1, C1
Note Max: Octave 1, B1
This ensures that incoming MIDI notes from Chordwalk fall within the intended pad-mapped range and trigger the correct drum samples.
(See the images for examples of the recommended minimum and maximum note range settings.)
Verifying Note Mapping Using the Chordwalk Virtual Keyboard
You can quickly confirm the correct note range for any virtual instrument track in MPC Beats by testing it with the virtual keyboard in Chordwalk. This helps ensure your note assignments stay within the selected instrument's mapped range, preventing unwanted or incorrect sounds.
To verify note mapping:
Pair the virtual keyboard area in Chordwalk with the MPC Beats track you want to check.
In Chordwalk, activate each virtual keyboard note one at a time, beginning at C1.
As you step through the notes, it will immediately become clear which notes produce the intended sounds and which fall outside the usable range.
This simple check lets you quickly identify the correct note span for your mapping and avoid any notes that trigger incorrect or silent responses.
